DIY Decorating Made Simple
Posted by Kirsten Sharp on Mar 28th 2025
The DIY Decorating Struggle Is Real
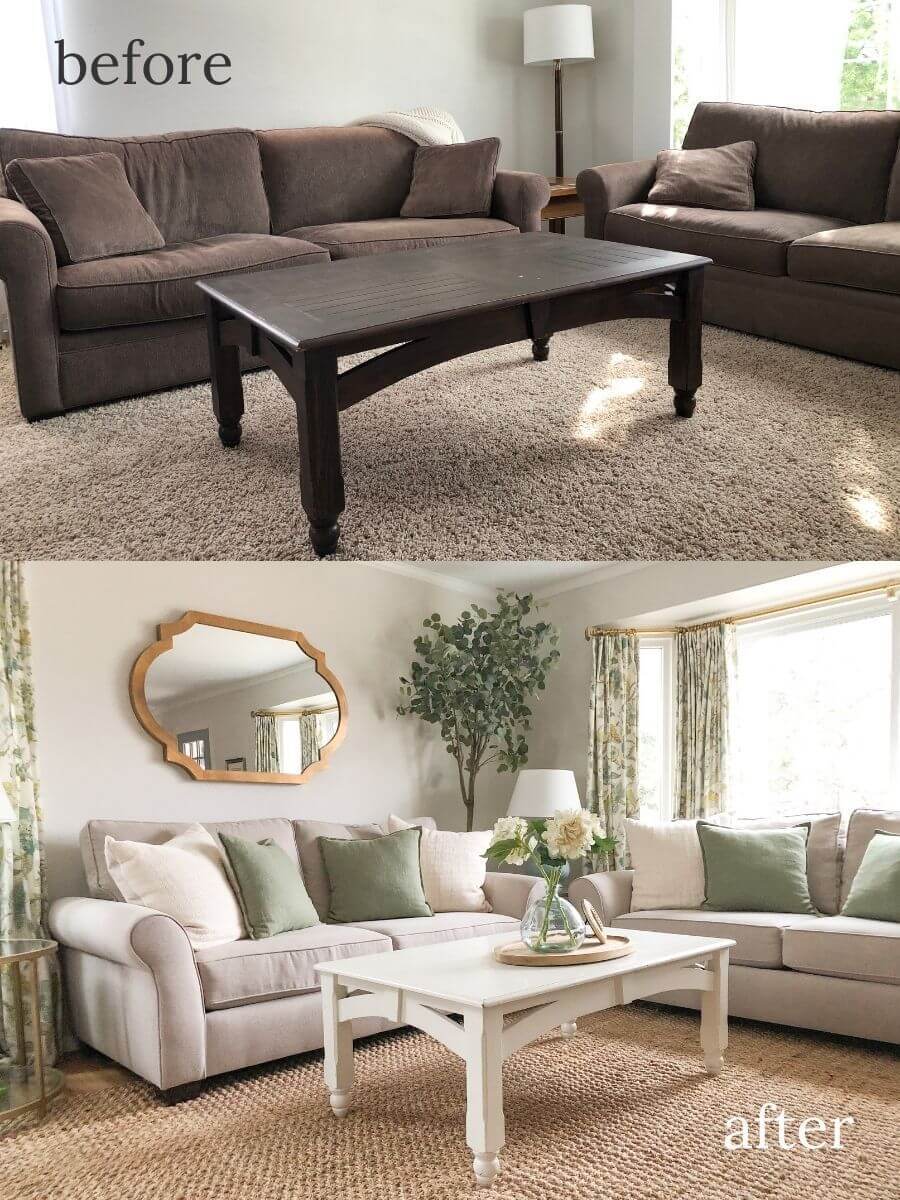
When we first moved into our house years ago, I was on the struggle bus BIGTIME when it came to decorating – I had grand ideas for what our house could look like, but I struggled with knowing where to start.
(This post may contain affiliate links, and I may earn a small commission if you make a purchase through them, at no extra cost to you).
- I’d go shopping for decor for our house, only to second guess myself and return everything.
- I’d paint a room a new color hoping it would magically look like the one I saw on Pinterest (spoiler alert, it didn’t!).
- I knew I wanted to decorate my house myself without hiring a full-service interior designer but felt like I needed some guidance to help me move forward.
- I wished I had a big picture plan for decorating my house so I could check the boxes off one by one and feel like I was actually getting somewhere.
Instead, all my ideas (and accompanying frustration) were just swimming around in my head. Several years went by and my house didn’t look any better.
Sound familiar?
A Whole House Decorating Plan
I created the DIY Decorator Package specifically for people just like her (and me 10 years ago!) —those who want a clear, cohesive plan for their home while still making it uniquely their own. Rather than having a “done for you” design, it’s more like having a decorating coach.
I’ve been working with a client recently who is in a similar situation and I thought it might be helpful to show you how we came up with a whole house decorating plan for her.
A Lake House With Potential

First, a quick backstory on my client. She has a lakefront house in Minnesota with amazing views (Jealous? Who, me?).
While the house has good bones, there was an awkward addition to the back of the house years ago which presents some unique design challenges.
There are some outdated rooms (specifically her kitchen and primary bath) and she’s unsure of what to tackle first. While a full house remodel would be wonderful, she’d like to salvage what she can to minimize big renovation projects.
Let’s dive in!
The DIY Decorator Process
1. Share Your Space
When someone invests in a DIY Decorator Package, we start by gathering information – The client takes photos of each room, as well as a video walk through so I can get an idea of how the house is laid out. I also invite clients to send me a link to a pinterest board with pins of spaces they love – this allows me to coach the client on ways to incorporate their unique style and favorite colors into their home.
2. Quick Chat
Then we have a brief video call to make sure I understand the client’s vision for the home, and the struggles that are keeping them stuck.
3. Personalized Plan
Then I get to work on creating a decorating plan!
4. Final Review Call
When the plan is done, we’ll hop on a longer call to go over my recommendations, answer your questions, and make sure you feel confident moving forward.
Now, let's get going and create my client's decorating plan!
Where To Start When Decorating
This may not be the way everyone decorates, but I always start with an inspiration piece. This could be a patterned fabric or favorite piece of artwork – the trick is that it needs to have multiple colors so we can use it as the color palette for our house.
Sidenote: I have a new Decorating Made Simple course coming out soon that goes through my decorating process in detail – And when you purchase a DIY Decorator Package, you automatically get access to the course!
When I look back at my client’s Pinterest board, I noticed she loves color – specifically navy blues and darker greens, which is great because that’s a perfect color palette for a lakehouse!
I encourage clients to choose an inspiration piece that speaks to them (a great way to make your space uniquely yours!), and pull the colors from there as they select throw pillows, rugs, and decor for each room.
Even though specifying exact home decor is not part of the DIY Decorator Package, we can certainly set up a separate call together once you start shopping and I’d be happy to give you a second opinion. I also go over all of this in the Decorating Made Simple course.
Here’s an example of an inspiration piece (the patterned wallpaper in the middle) that would work well for my client. Notice how easy it is to pull colors from the inspiration piece for rugs, tile, countertops and more:
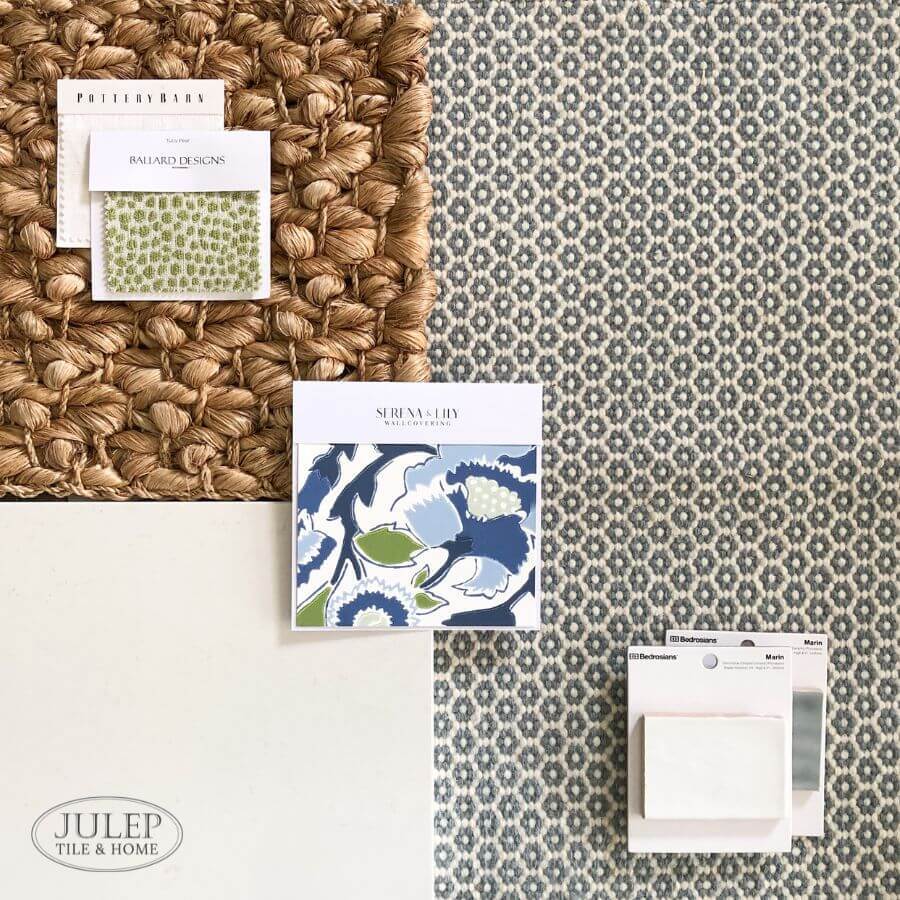
Shop The Look: (top left) Serena & Lily Signature Abaca Rug, Ballard Designs Tully Pear swatch, Pottery Barn Emery Drape White swatch | (right) Dash & Albert Honeycomb French Blue Wool Rug | (bottom right) Bedrosians Marin Tile in Pearl White & Misty Blue | (bottom left) Cambria Smithfield Quartz Countertop | (middle) Serena & Lily Cassis Wallpaper Swatch Hydrangea
Now that we've got a general idea of what our color palette is for the house, I can start reviewing the rooms one by one and give suggestions on what colors might work best where.
Having a color palette in mind is especially helpful in rooms like the kitchen where you're making big decisions on cabinet, backsplash and countertop colors.
Kitchen Decorating Plan
Since the kitchen is usually the most expensive room in the house with the most permanent finishes, I generally start here.
As you can see, my client’s kitchen has a pretty strong 90s vibe with the oak cabinets and maroon accents. When we began her call, she was pretty convinced she’d need to gut the whole kitchen in order to update it.
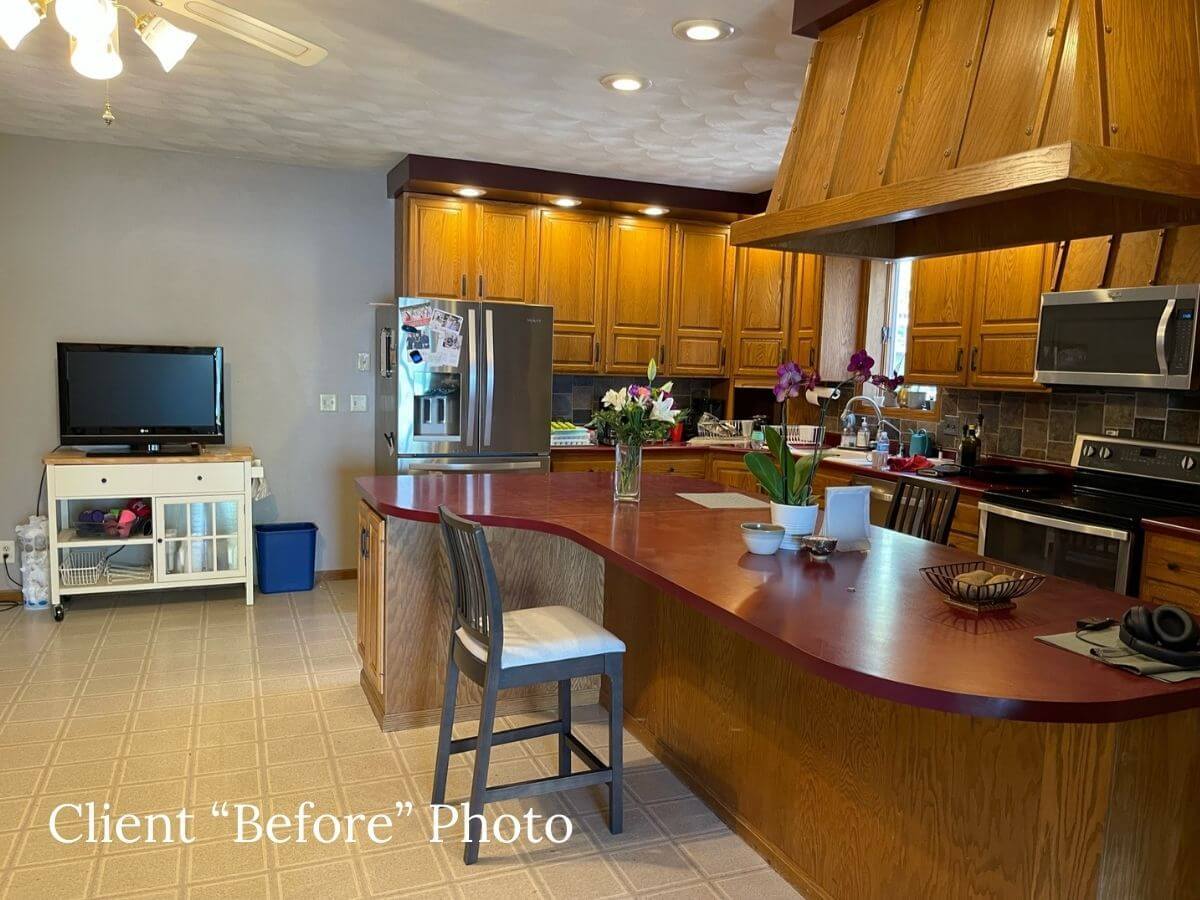
What’s interesting, though, is that in her Pinterest inspiration board, I noticed that she had multiple images pinned with a similar oak color wood. Whether it was a bookshelf or a coffee table, I could tell this color wood was something she naturally liked – which was surprising to her when I mentioned it as she hadn’t noticed! (This is where a fresh set of eyes on your space can be really helpful.)
What was throwing her off were the other finishes in the room that were dated. When she indicated that the cabinets were still in good shape, I knew that working around the existing oak cabinets might be worth a shot.
Here are my suggestions for a much lower cost update to the kitchen:
-Leave the cabinets as-is
-Replace the countertops
This will be helpful in a few different ways.
- First, the existing countertops are laminate and not in great shape.
- Second, it would allow her to remove the awkward “appliance garage” in the corner and free up more countertop space.
- It would also be a great opportunity to make the island countertop rectangular (and not a funky curved shape) with an overhang large enough to allow for seating. A nice white quartz countertop would look amazing and would help lighten up the room.
-Replace the backsplash
Usually, I would suggest that if you wanted to be really budget-friendly, you could just paint the backsplash (yes, paint!), but if she removes the appliance garage, there would be an area of drywall with no backsplash. For that reason, I’d suggest a subway tile backsplash in a color that coordinates with her inspiration piece – it could be white, or even a lighter color like a light blue. I wouldn’t go too dark here as we need to lighten things up to compensate for the darker cabinets.
-Remove the upper cabinets in the coffee bar area
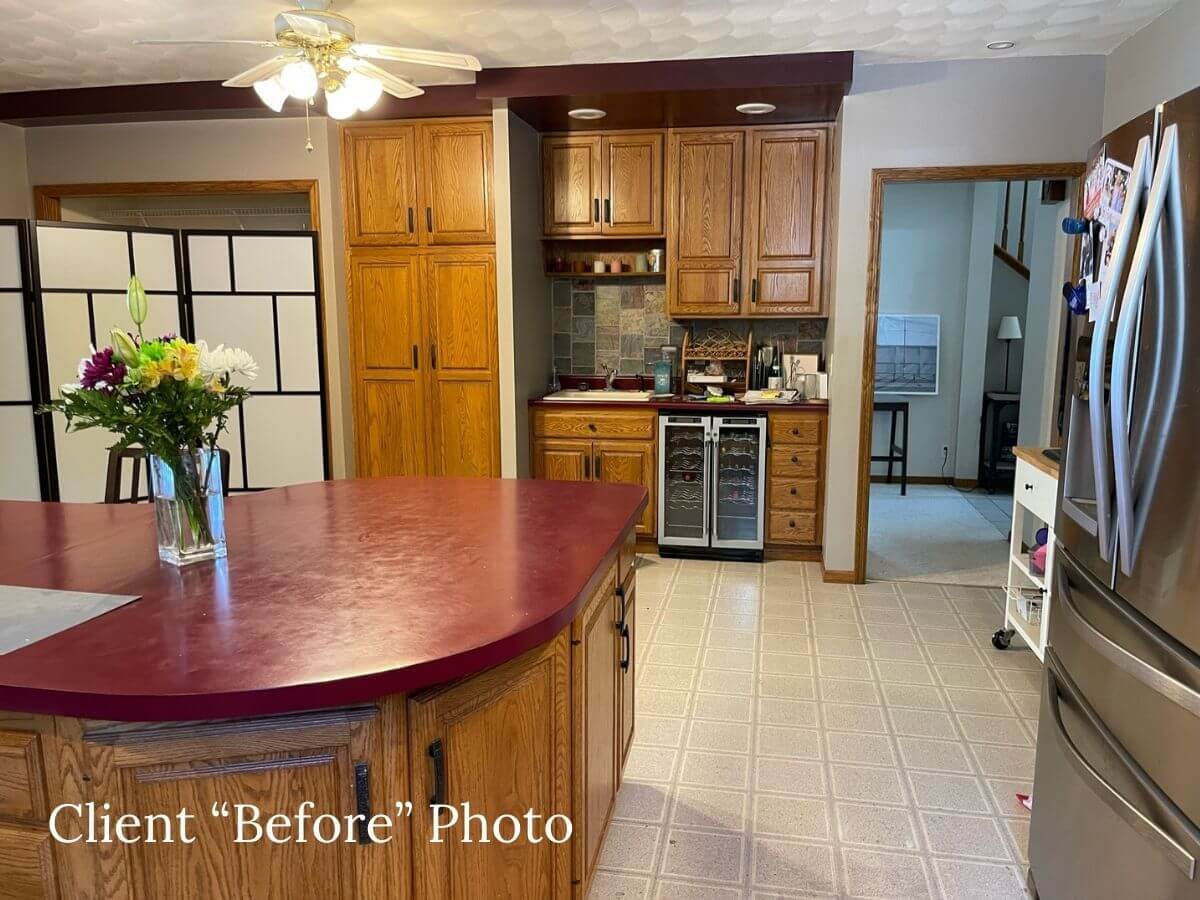
Since she already has loads of storage, she could afford to remove the upper cabinets and run the new backsplash from the counter to the ceiling. Anytime you can run a backsplash to the ceiling, it creates helps make the room feel taller and more impressive. If she wanted, she could put in some open shelves.
-Paint the soffits
If you’re not familiar, a soffit is a drywall box on the ceiling – cabinets are often hung from soffits. Normally, I’d recommend painting the soffits the same color as the cabinets to make the room feel as tall as possible. Because it would be hard to match the oak color and because my client’s ceilings are already quite tall, I’d recommend just painting the soffits the same color as the ceiling. There’s also a funky bit of soffit near the coffee bar without cabinets underneath which would only make sense to paint the ceiling color. This should help make them visually disappear.
-Remove the mystery oven hood and add pendant lights
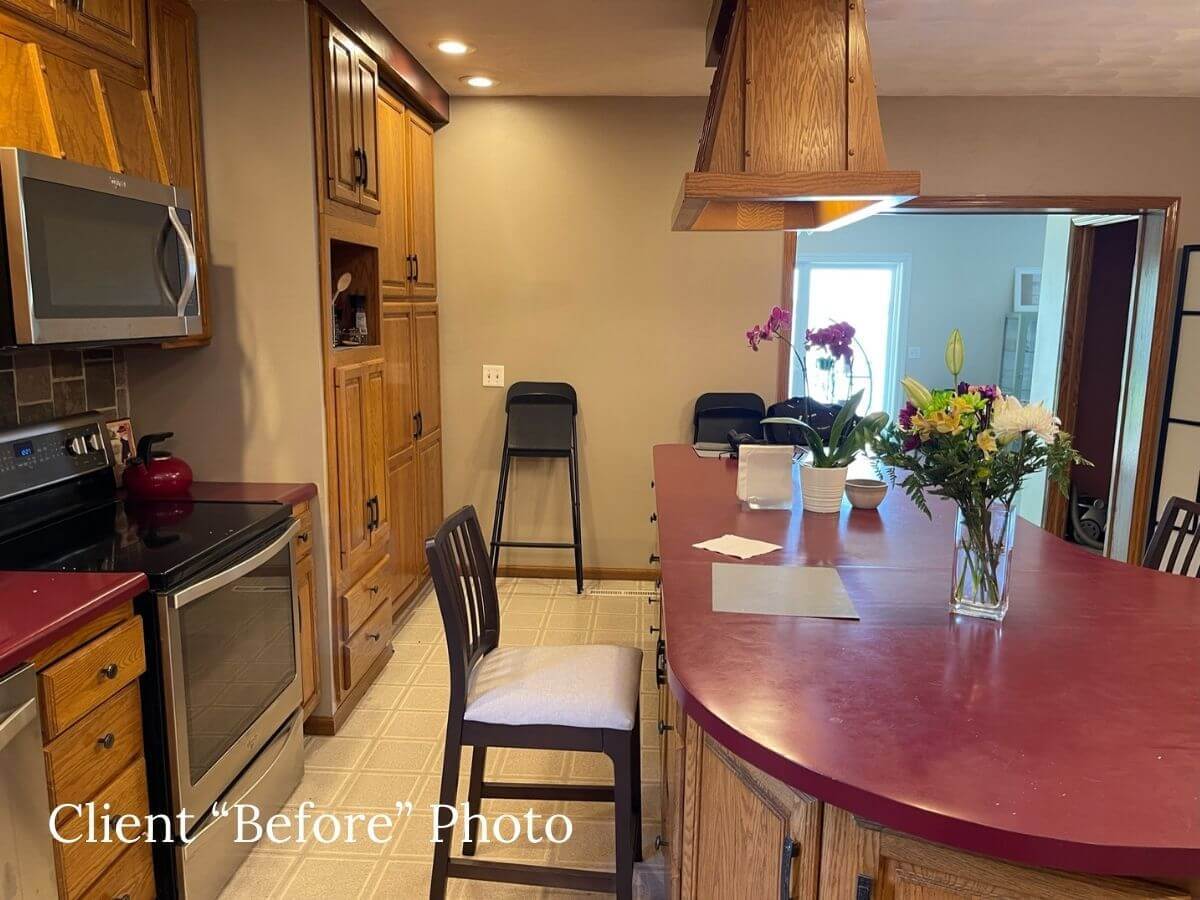
Neither she nor I could figure out this really weird oven hood (that has lights inside instead of venting??). Removing it would allow her to pick out some pendant lights and center them above the new island. She’d need to do some digging or contact a contractor though to make sure the hood is not hiding any plumbing or ductwork that would prevent her from removing it.
-Flooring
This would likely be a larger ticket item, but replacing the laminate floors would go a long way to update this space. Also, there are several different types of flooring throughout her main level. Changing them all out to one, single type of flooring could make a huge difference in her home as it would make it feel larger and more continuous (rather than chopped up by different types of floors in different rooms). She has a couple large dogs so LVP (luxury vinyl plank) might be a sturdy and cost-effective flooring to consider.
-Styling
This is one of the cheapest and most overlooked ways to make your house look more pulled together! Spoiler alert - I highly recommend this for every room!
I suggested she add some colorful accessories to the kitchen that coordinate with her inspiration piece – like a patterned roman shade above the kitchen sink window, some green house plants, or a coordinated runner rug (I also go over all my tips for this in my upcoming course!).
The trick is to be intentional with what stays out on your counters. In kitchens especially, you often have to incorporate functional items (like a toaster, for example) into your styling so choose cute ones in colors that coordinate with your inspiration piece when you can!
The Decorating Made Simple course that comes with the DIY Decorator Package walks you through exactly how to style a room. The course is also available to purchase separately if you feel you don’t need the extra 1:1 coaching!
Alternate Kitchen Option:
If the budget allowed, my client could also just go ahead and have the cabinets painted. While I think she could create a beautiful kitchen with the existing oak cabinets, one benefit to painting them is that she could paint out the endcaps that don’t have the oak finish. She could also paint the soffits the same color as the cabinets, at least on the kitchen side (likely not the coffee bar side).
Living Room & Dining Room Decorating Plan
These rooms are both part of one long room (which is the awkward addition to the back of the house that I mentioned earlier). With that said, they also have the best views in the house as they overlook the lake so we want to make sure to make them as functional as possible.
-Furniture Layout
My client struggled a bit with deciding where to put a dining area and where to put the living room. There’s also a fireplace at one end that she’s not in love with. Let’s break this all down.
Here the overall shape of the space.
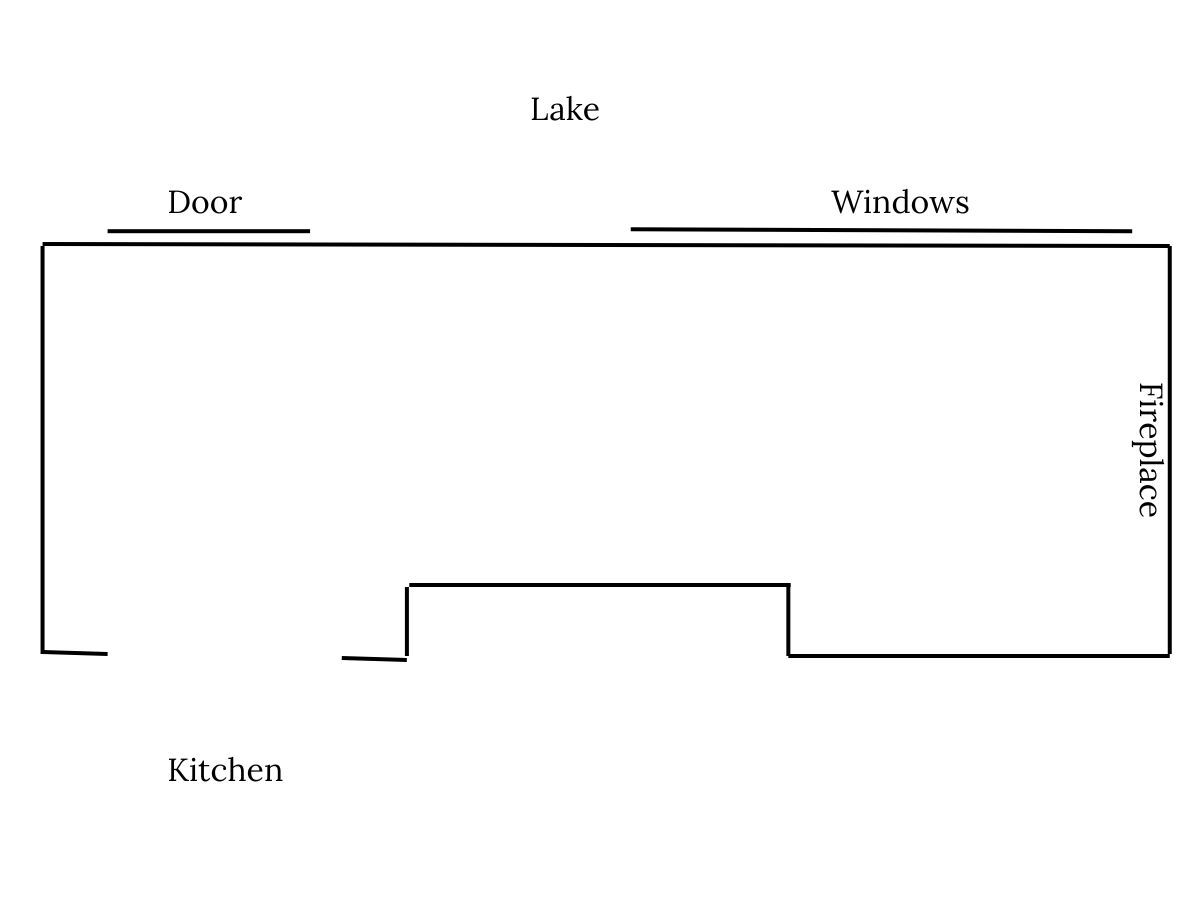
It’s a little challenging since it’s pretty long and skinny but here’s what I suggested:
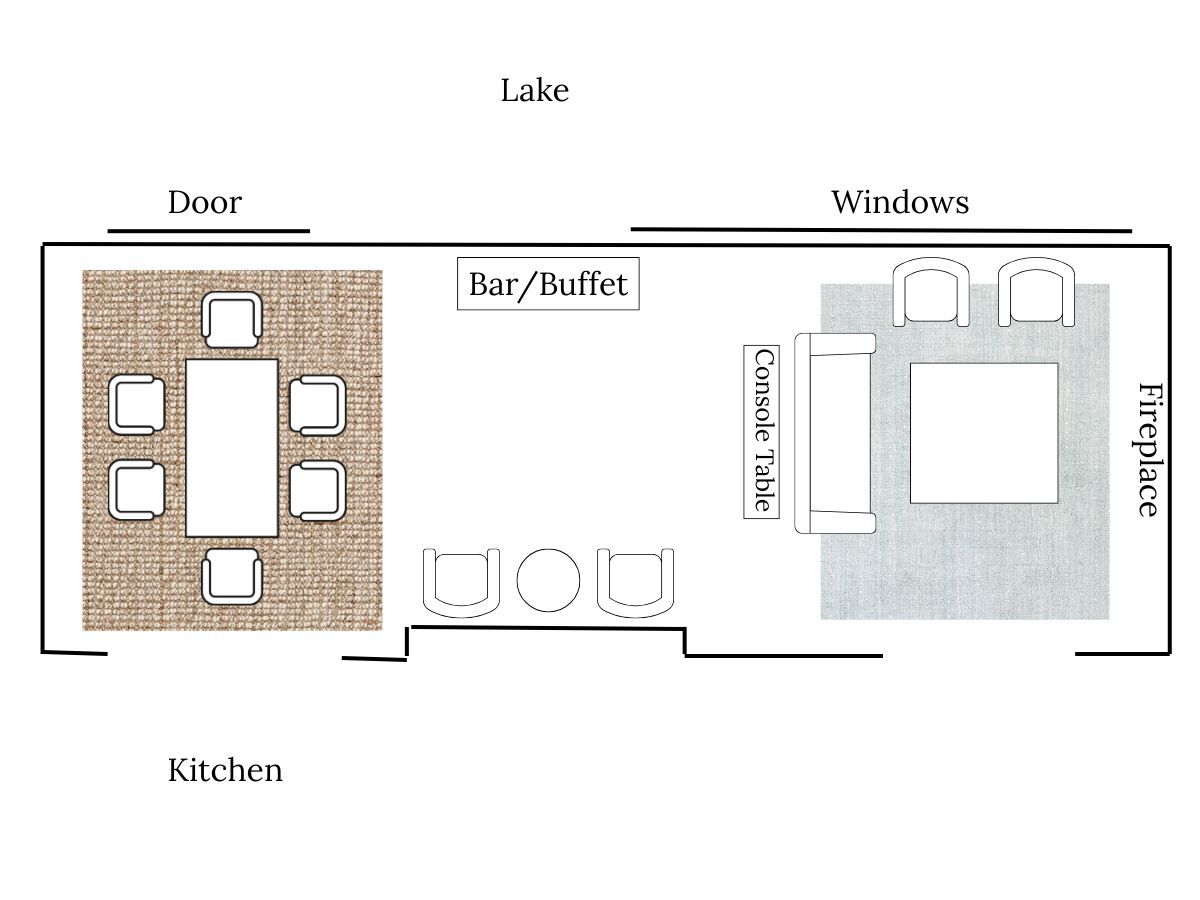
Keep in mind this is not to scale (and wouldn’t be with any drawings in the DIY Decorator Package). I don’t do layout drawings like this for every room but sometimes it’s easier to explain layout ideas with a visual – especially in challenging spaces like this
I suggested the dining room go on the left side since that’s closest to the kitchen. You’ll notice I added a large area rug in both the dining and living room – Not only does this add to the space aesthetically, but visually it separates the spaces. The console table behind the couch also helps separate the spaces. I added a bar/buffet table against the outside wall and added a couple chairs across from that for extra seating. I suggested the client consider swivel chairs for the two armchairs in the living room so they could rotate them to take in the view if they wanted.
-Fireplace Design
Now let’s tackle the fireplace that the client didn’t love.
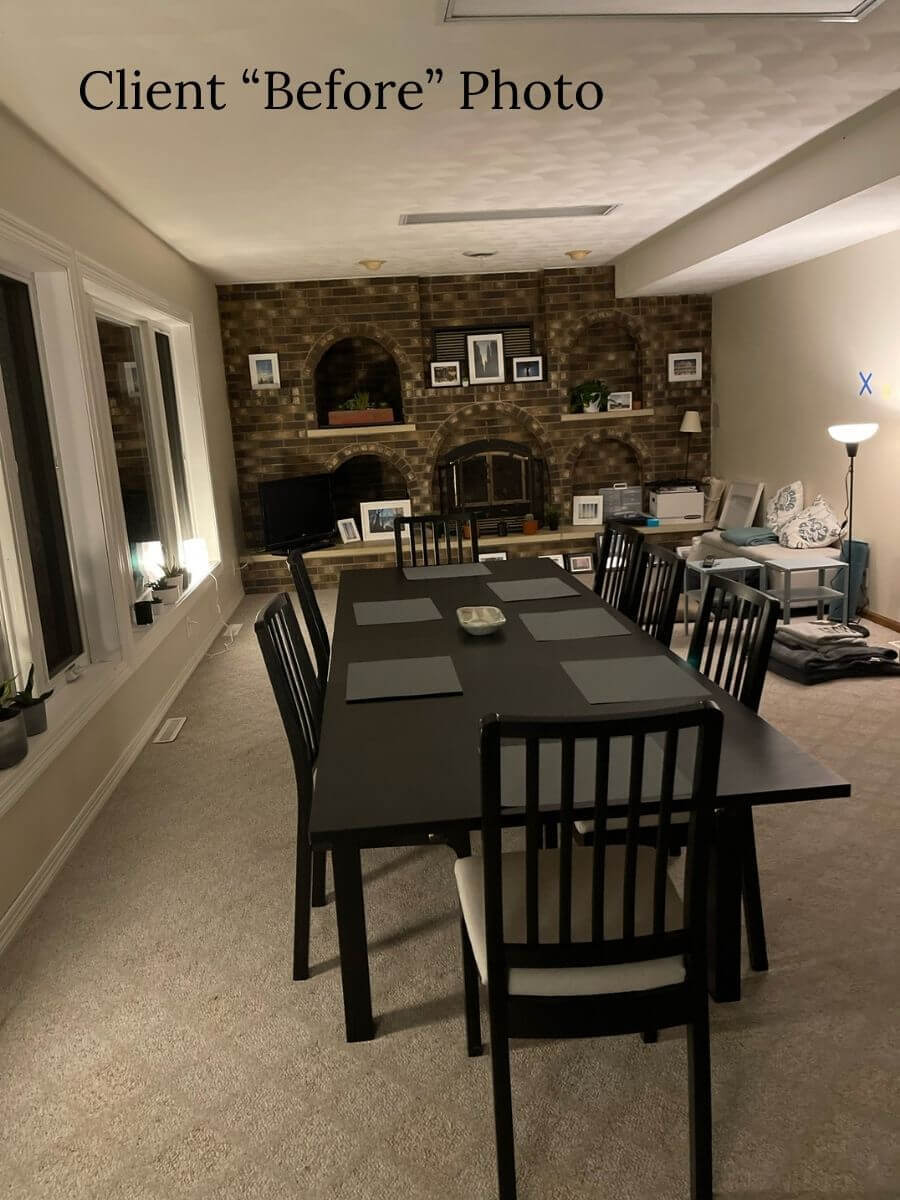
I know everyone has different opinions about painting brick, but painting the fireplace would be the cheapest and easiest way to give it a fresh look. Painting it a similar color to the wall color will also help it blend in. Right now, the fireplace is the focal point in the room since the fireplace is dark and everything else is lighter in color.
I would also avoid adding accessories to the arched cubby areas as that will also draw attention. Alternatively, she could consider having the fireplace refaced with a different stone or brick.
-Window Treatments
Another issue my client expressed was that she wished the windows went all the way to the ceiling.
She also wished the ceilings were higher in general (they’re lower in this room than in most of the house). While she could certainly get new windows priced out by a contractor, one suggestion I have is to get creative with her window treatments.
By adding a roman shade just above the window, and curtains hung as high as humanly possible, she’ll have the illusion that her room is taller and her windows are larger, without any construction.
Here’s a mockup, same size tiny window on the left and the right:
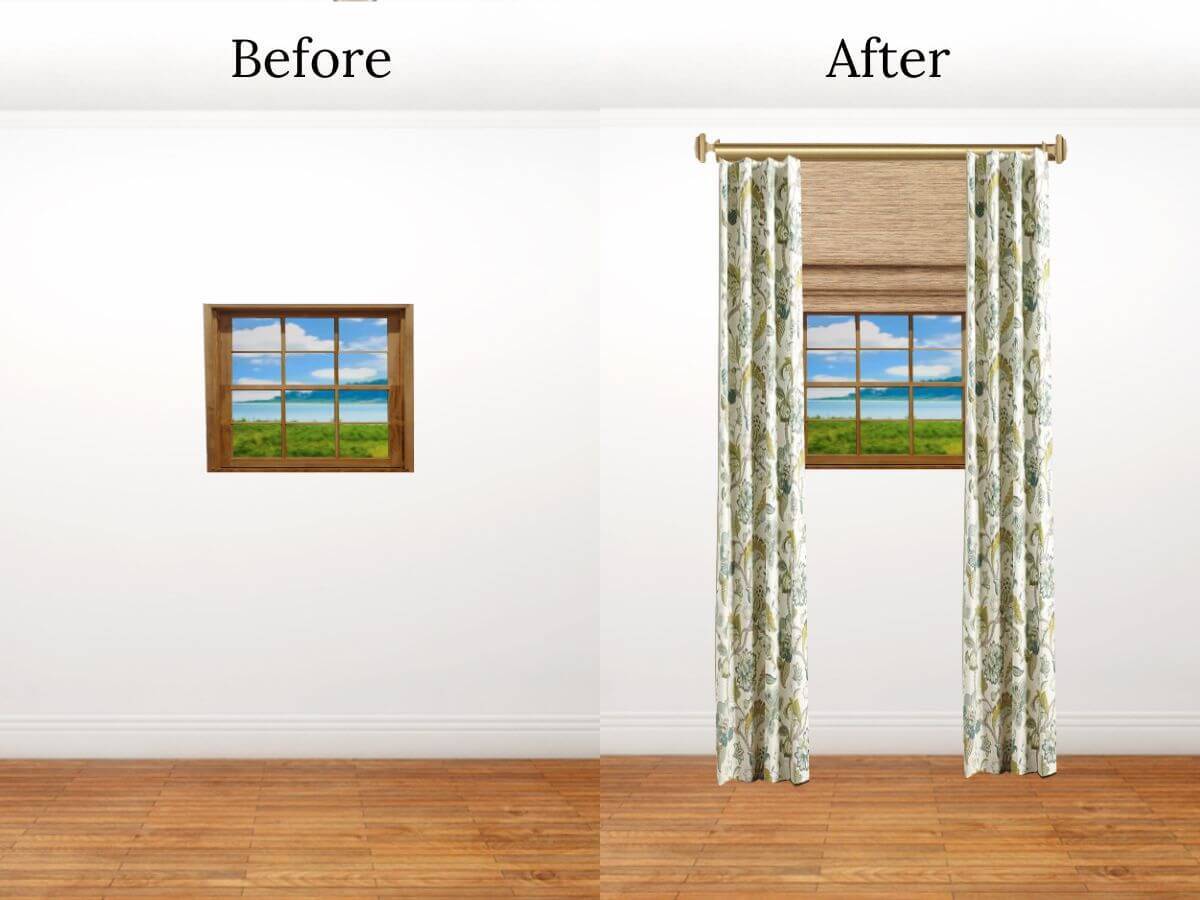
I would advise using white or light color curtains to blend in with the window frames and not detract from the view of the lake which is the real star of the show here!
Bonus Room Decorating Plan
-Purpose Of The Room
Since we’ve got the dining and living rooms covered, this room is a very large “bonus room” that’s looking for its purpose in life.
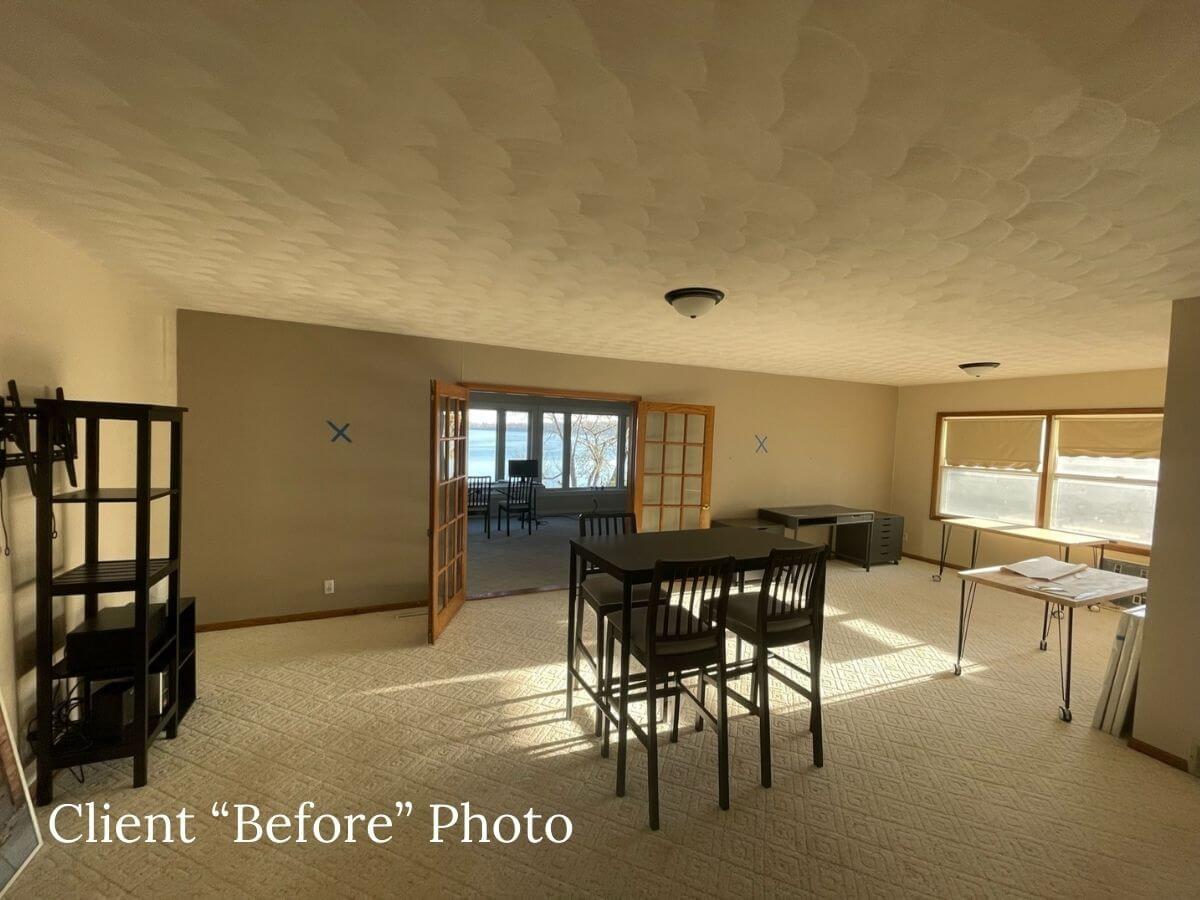
Bonus rooms can be a major source of indecision and anxiety as you could use them for so many things! A bonus room could become an office, a music room, a game room, etc.
In talking with my client, she mentioned that she would like a casual place for friends to hang out – perhaps with a tv and a pool table. This room is perfect for that as you could have a tv, perhaps with two parallel couches on the left side of the room, and a pool table on the right side.
-Window Treatments
I would suggest using the same window treatment trick in this room – with roman shades just barely touching the top of the window and curtains hung as high as possible.
-Area Rugs
This room is currently carpeted but you could also add two large area rugs here if you wanted – one for the tv area and one for the pool table. Just as we did in the living/dining areas, adding two separate area rugs will help define each space: the tv area and the pool table area.
Entryway Decorating Plan
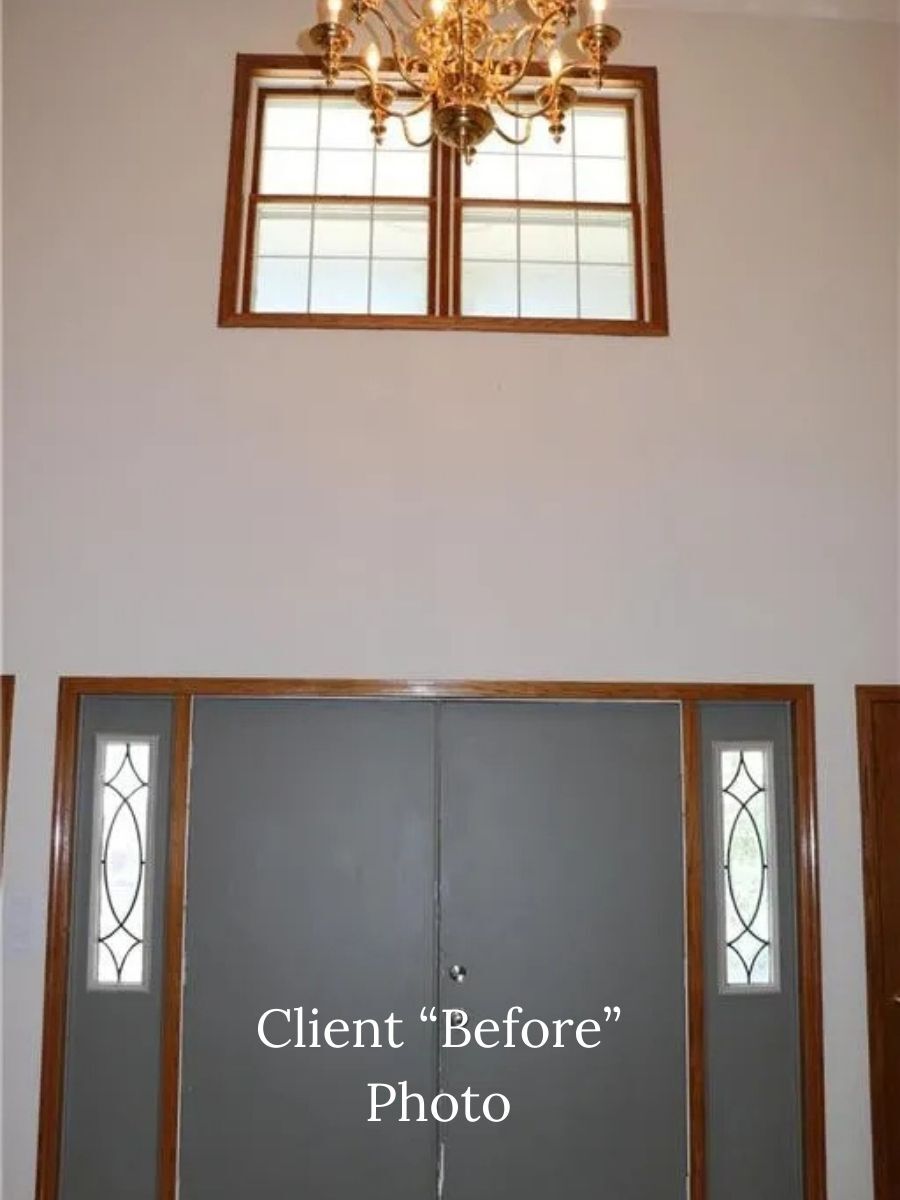
My client was not super jazzed about her entryway – While it’s tall and quite grand, there are some awkward things going on.
-Front Door
First, the front door is very wide but also has very little light coming in. Seeing as how it also leaks air underneath (in Minnesota, brr!) I think replacing the front door could be a top priority
However, if replacing the door isn’t possible yet (I imagine a door that big would be a chunk of change) my only other suggestion is to add molding to it. While it obviously wouldn’t add more light, it would make it look a little more custom and less industrial. I’m sure there are lots of tutorials on Youtube, but here’s one I found to show you what I mean.
-Lighting
Swapping out the chandelier would also make a big difference in updating the space.
-Awkward Niche Advice
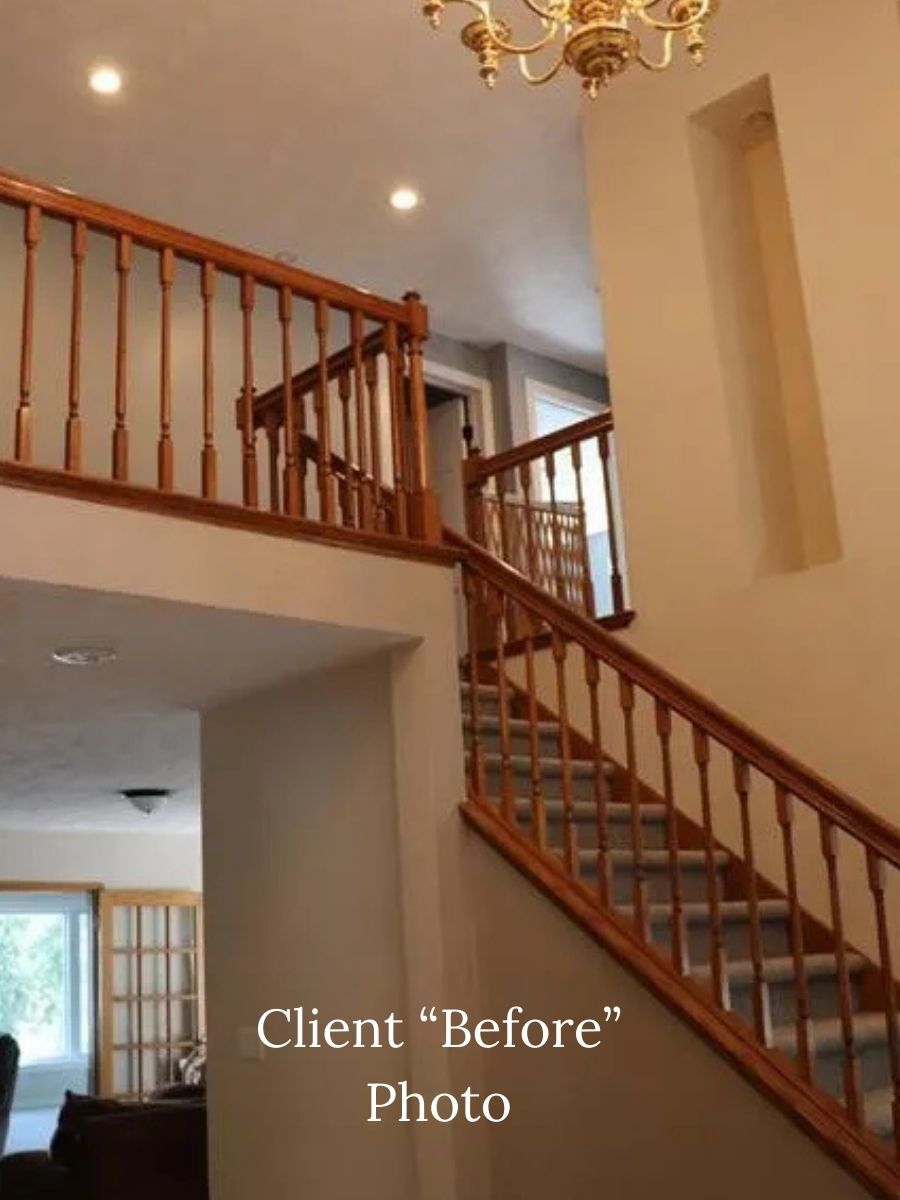
Next, she pointed out the rectangular niches in the drywall – you can only see one in the photo but there are actually three of them.
You could get a contractor out to drywall over them, OR you could just hang some artwork to cover them – Either three tall skinny pieces or one large landscape piece. Once you get those in, no one will ever know they were there! Plus, it would add some color and interest to the entryway as well.
-Stairway Railing
My client was trying to decide whether or not to paint the railing on the stairway and while she certainly could, I think if she did, she’d need to paint alllll the trim in the house because it’s all the same wood. While she could definitely do that (and if she did, I’d recommend installing a much taller baseboard at the same time – about 4-5 inches tall), I think you could work around it – especially if she decides to keep the oak kitchen as it would tie everything together.
-Area Rug
My last suggestion here is that adding a decent sized area rug in the entry would soften up the space.
Finalizing The Whole House Decorating Plan
And that’s a wrap on the first floor! While I'm not including the rooms we planned out on the second floor, hopefully the rooms I shared gives you an idea of the process in the DIY Decorator Package.
So, if you love interior design but you’re stuck somewhere between hiring a full-service designer and just leaving your house as-is, my message to you is: keep going. Keep learning, keep trying new things, and keep asking for help when you need it.
To all the DIY decorators out there, I’m cheering you on! And if you need support, here are a couple ways we can help:
You can check out the DIY Decorator Package here:
And you can find our Decorating Made Simple course here:
RELATED POSTS:
Bookshelf Styling Ideas With Pink Decor
How To Create A Whole House Color Scheme
Perfect Countertops & Backsplashes For Benjamin Moore Pale Oak Cabinets


